Monday, October 31, 2011

HAPPY HALLOWEEN!!!!!

Hello and Happy Monday everyone! I hope you all
had a fun weekend! Mine was super busy and it will
continue to be that way for awhile! Last week I told ya
I had something to tell you... But I wanted to wait til
this week to announce it.... It was Good News & Bad News...
I guess I'll start with the BAD NEWS first! With a very, very
heavy heart I have to leave the blogging world for awhile.
Something very exciting has come up and I won't have any time
to blog or craft. I've acquired a Thrift Store! YES! I said a
Thrift Store. As of tomorrow I'm the new owner and I've
spent this last week working on it and trying to clean it up.
And this is a HUGE deal for me and I'm super excited about it!
 I just had to give up my First LOVE- CRAFTING! Not forever
of course.... Just until I can get the store more organized
and just the way I like it and then I should get some free
time to craft again! (I hope anyway)! Between Homeschooling
and this new venture I won't have any time to even blog hop!
I can't believe I just typed that! If I get any spare time at all
I will try and visit all my wonderful Blogging Buddies!
And Please don't be sad! This is a great thing that's
happening to me and my family and I know once I get
it all squared away it will be a great store!
So to those who e-mail me.... please keep e-mailing me...
I want to know how things are going and I'll tell ya
about my crazy adventures too! You guys know I LOVE
to TALK! :o) So e-mail me often! And I will try to make
time to say hi whenever I can! I told ya there was
Good News & Bad News! They kind of go hand N hand!
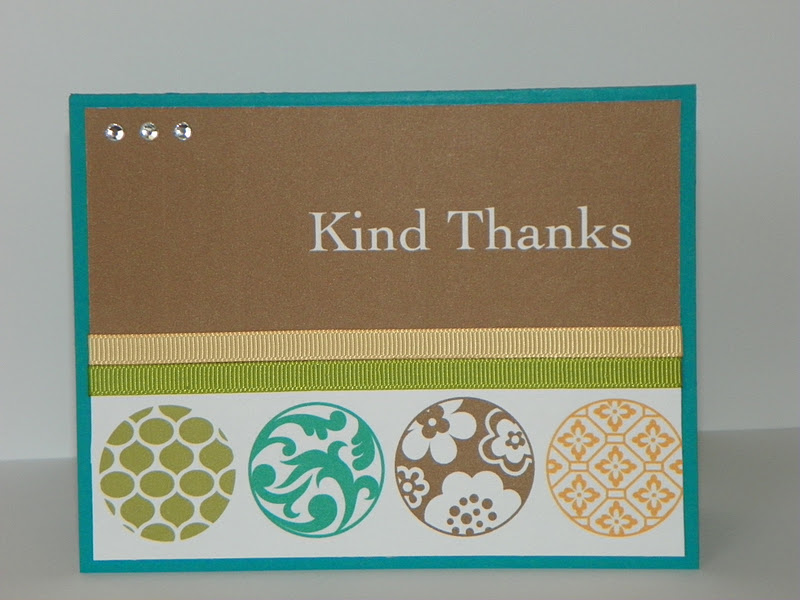
I do have a card for you today to! Soooo here is my Hybrid Card!


 I got the template from My Digital Studio (SU)
I basically printed out the pumpkins and the rest
is all traditional crafting! That's it! :o)
I hope you all have a wonderful Halloween and I will
be back on Wednesday with my last design team
card for awhile... Sooo I hope to see you then!
Have a SPOOOKYYY HALLOWEEN!
HUGS!

Theresa

Thursday, October 27, 2011

EEK! A Spider!!!

Hello and Happy Thursday! The Week has gone by so
fast... Where did it go? Seriously? Who pushed the
fast forward button? Hummm? I know I didn't do it!
I need time to sllloooowwww down! Not hurry up!
Oh well... I guess I will just show ya my card before
someone pushes that button again! :o)


Yes it's a Hybrid card! I used a Digital Template to
create this card and turn it into a Digital/Traditional format....
Gems are Bazzill
Bakers Twine
Martha Stewart Border Punch (Goo)
Everything else is Stampin' Up
The paper is regular designer paper and the
only part that's digital is the stamped items...
Yup! I did not stamp them myself.. I printed them
on the purple designer paper... I did some inking and
attached everything... And BAM you've got yourself
another quick Halloween card!

Well... it's the end of the week for me so
I'm hoping to get some time to create something...
ANYTHING! I'll just have to wait and see what time
is available for me... In the mean time I hope
everyone has a Terrific Week/Weekend and I'll
see you all on Monday! Have an AWESOME DAY!!

Theresa

Wednesday, October 26, 2011

Monster Mash!!!

Hello and Happy Wednesday everyone! It's super
cold outside today! I just feel like curling up under
the blankets and staying warm! Ahhh I LOVE that idea! :o)
Today's card is for the Cricut Cardz Challenge!
This week's Challenge is:

“Spooks, Monsters, Ghouls and Goblins” Make a card for Halloween using ANY Halloween image you'd like from any cartridge(s), and using any colors you’d like.

Halloween is almost here.... so this is a great challenge right
before the BIG Day! Let's see what I created....

PHOTO REMOVED FOR PUBLICATION!!!


Card stock, Ink - Stampin' Up
Designer Paper - DCWV
I used Bo Bunny for ALL the cuts
White signo Gel Pen
Black Stickles for the eye
Cartridges - Happy Hauntings (Frame) Cut @ 3 1/2"
(Monster Mash) Cut @ 1 1/2"
Bump in the Night (Monster) Cut @ 1 3/4"

Now that you've seen what I've created, I hope you
join us for one last chance at making a HALLOWEEN CARD!
I can't wait to see what all of you create!
Thanks soooo much for stopping by!
Have an AWESOME DAY!!

Theresa

Tuesday, October 25, 2011

31st......

Hello and Happy Tuesday everyone! I hope all of you
are not as busy as I am right about now! :o) It's getting
super cold outside since we have 2 lovely cold fronts
coming through which may also bring us some snow!
Not that we haven't already gotten snow but more of it! UGH!!
Today's post involves my Digital Program called
"My Digital Studio" from Stampin' UP! You guys remember
all my "Thank You" cards that were Hybrid's = Digital & Traditional
combined! My MIL LOVED them! And so I have more because they
seem to be the only ones I can get done a lot quicker than
my regular ones! :o)


This one was super simple as you can tell!
The (BOO) Punch is from EK Success
Everything else is Stampin' Up

I Printed out the Designer Paper and adhered it to my card
Then I punched out the Boo Border and attached it
Then I printed out the Happy Halloween Stamped Image
and cut it to size... I used my We R Memory Corner punch
and pop dotted it up... Super quick card to get out to
someone right away for Halloween! Can't get any easier! :o)

Thanks sooo much for stopping by and saying HI!
Have an AWESOME DAY!!

Theresa

Monday, October 24, 2011

Yummy Holidays!

Hello and Happy Monday Everyone! I hope you all had
a Fabulous weekend! Mine was super busy! I barely had
anytime to craft! There is sooo much going on in my world
right now that I think I'm gonna go stir crazy! LOL
The visit with my son was wonderful! We really enjoyed
seeing him... He'll be back for Thanksgiving... Can't Wait!
Juston never got to make dinner for his brother but he did
make dinner last night with help from his dear old mom! :o)
It turned out yummy and all is well in the cooking world! tehehe
I've got some news to tell ya but will wait a little longer
before I do... (I know bad tease!) But it involves a HUGE
change in my life and maybe a lot less crafting!  So it's a
good/bad thing so to speak... I will explain more later....
Luckily for me I always have a stash of cards that I've made
to help me out on days I'm not able to craft... Sooo today's
card would be one of those! Heck this weeks cards are!!! LOL


Card stock, Ink - Stampin' Up
Designer Paper - Echo Park
I used Bo Bunny for all the cuts!
Red/White Bakers Twine
Googlie Eyes - Darcie
Red Christmas Stickles
Stamp - My Pink Stamper (Happy Holidays)
Circle Punches - EK Success
Cartridges - Just Because (Gingerbread) Cut @ 3"
4x's flipping 2 of them
Sugar & Spice (Shapes) Cut @ 1.85" 4x's

I hate to chat and run but I really do have
a MILLION things to do today! Thanks soooo
much for stopping by... I always appreciate it!
Have an AWESOME DAY!!

Theresa

Thursday, October 20, 2011

Thank You Series #3....

Hello and Happy Thursday Everyone! It's the end of
the week for me and I've got a whole list of things I need
to get done! Plus my son didn't come home last night
like he planned so he'll be home this morning! Hunter
was so disappointed when I told him he wasn't coming
yesterday... But he's super excited that he'll be here today!
Mathew received a letter from Hunter about a week ago.
So he told me he would talk to him about what he
wrote him..... Brothers bonding! How great is that? :o)
 I got my grocery shopping out of the way yesterday
so I can feed him some home cooked meals... And now
I'll just try and enjoy the long fall weekend! 

This one started out as a 5 x7 designer template card until
I altered it! I changed the floral design to white then printed it out...
I printed the "Thank You" on white Card stock along
with the colored circles... then I used my scallop punches to
punch them out and adhere them to my card.....
I added a couple of buttons with some twine and I
added some green ribbon.... I really like how this card
turned out! Such great colors! :o)


This one started out as a Happy Birthday Designer Template....
I printed out the yellow dots and added the the green dots and
rust color dots... they were also printed out! Then I added the
"Thank You" to the blue label and printed it out... I cut it out by
hand... Then I enlarged the flowers so I could punch them
out with my flower punch and added a button with some twine
and there you go again.... Another quick and simple card to make
and mail off right away if you need to!

Well that's the end of my "Thank You" series of cards....
I'm pretty sure my MIL will love these cards and she'll have
nooo idea that I used my computer to print out the pretty
papers or add the sentiments because you really can't tell!
Thanks for joining me this week with my "Thank You" Card
series in Digital/Traditional design! I hope you guys
think about digital crafting in a new way and maybe
even try it! I would LOVE to see what you make!
Let me know if you've done some so I can stop by and take
a look and leave you a comment!
I guess that's it for me this week... I hope you
all have an AWESOME Week/Weekend!!

Theresa

Wednesday, October 19, 2011

Thank You Series #2....

Hello and Happy Wednesday! We are in the middle of the
week already.... WOW! This month is sure flying by!
My oldest will be home tonight and Hunter can't wait!
My other son Juston is actually gonna cook dinner Friday
night for all of us! I'll let you know if I get poisoned or not! LOL
He works at a burger joint so I think I'm OK... But he's not
making any burgers! Sooo I'm not completely sure! tehehehe
I'm still hoping to get some crafting done this weekend but
we shall see on that too! With the older boy coming home to
visit and I have my card swap tomorrow and Hunter has a
Halloween Party on Saturday.... It may be a tight squeeze to
get some work done! I guess you'll know by Monday how
I did by what I post! LOL So here's today's "Thank You" Series Cards!


The only thing digital on this card is the Sentiment!
It was printed on white card stock, the Felt Flower
is glued on and I used an EK Success Flower Border
Punch and some pretty Pearls, the Striped paper
is SU Designer Series paper call Sweet Pea. This
card went together super quick! And it's mostly
all traditional supplies with an added twist of
 a  little digital sentiment! :o)


 I used a Designer Template for this card...
It was a HAPPY BIRTHDAY Card before I got my
hands on it! I changed the center circle from the Happy
Birthday sentiment to a flower, I cut out the green flower
with a flower punch then added a button with some twine...
I added the yellow ribbon and I put the "Thanks" on this card...
So it's traditional with some digital elements! Quick & Easy
yet again! What do you guys think of Digital? Are
you liking it at all? Just curious to know what your
thoughts are on Digital programs! :o) Well That's
it for me for today! I'll be back tomorrow with the
last 2 cards in this series! Have an AWESOME DAY!!

Theresa

Tuesday, October 18, 2011

Thank You Series #1

Hello and Happy Tuesday everyone! I really hope your
week is off to a great start! Mine is going pretty good so
far! I'm looking forward to the school Fall Break so I can
get started on some Christmas cards! We shall see if I get
anything done! :o) I've even designed some tags I'd like
to get done! Can't wait to get started!  I've made another 
Simple project for today, because my MIL asked me to make
her some "Thank You" Cards! Don't worry... there are only
6 cards for this series! So I'll show 2 today, tomorrow and Thursday!
It's like a bonus! 2 cards a day! How often do I do that?
Hardly EVER! I know! Right! LOL  :o)

First off... there is nooo Cricut involved in any of the cards
I made this week for my MIL! I went DIGITAL  again!
I hope you guys don't mind... But I do love my Digital Program
and I've been seeing so many blogs giving away a free digital
Program that I thought I would share with you some of the things
you can do with a digital program! Of course my program is
from Stampin' Up! And it makes creating Quick & Easy
when it needs to be! But they are ALL that way!


I have some digital templates in my program so I took
advantage of using them to create quick simple cards...
With a Digital Program you can alter anything
which I LOVE! This design had snowflakes and
some mittens and a winter sentiment.... then I changed
it to butterflies, thank yous and printed each piece out
to make it more traditional! Everything is layered instead of just
1 flat design because I still LOVE my traditional ways but
in a more modern digital age! :o) I used some staples and
a little bling to make this card! :o)
This is the color Combo : Baja Breeze, Riding Hood Red,
Chocolate Chip, River Rock, White


 I altered this one too with a digital template!
All Digital programs offer lots of templates or you
can design your own... Which I like both so it makes
it fun and easy either way you do it! :o)
I printed out the "Kind Thanks" with the Soft Suede
Color Card stock, then I printed out the colored
circles on the white Card stock so they can be layered..
Then I added 2 different colored ribbons and some bling...
And there you have a quick, simple and yet traditional
looking thank you card! :o) This one is suppose to be a
5x7 card.... but I altered it to fit a standard A2 size card!
The colors I used for this card are: Taken with Teal, Apricot Appeal,
Soft Suede, Old Olive, White

Well I hope you guys like my cards... I'll be back tomorrow
with 2 more and an explanation on how I created them!
Thanks soooo much for stopping by! Have an AWESOME DAY!!

P.S.- If you have any questions about my digital program from
Stampin' Up or another type please let me know and maybe
I can help you out or explain something you may not know or
let me know something I may not have known! :o)

Theresa

Monday, October 17, 2011

Owl-o-ween....

Hello and Happy Monday Everyone! I hope you guys
had a wonderful weekend! I had an interesting one! :o)
I found out that my oldest son who's away at school
will be home this week! They have a "Fall Break" this
Thursday/Friday so instead of staying at school he's decided to come
home and visit us! I think he was getting bored of being up
there by himself another long weekend! Apparently the kids
like to go home a lot to visit family and my son said it was to
soon to come home... But with everyone gone most weekends
he has nothing to do and no one to hang out with. Sooo I'm
guessing with this one being a Looonggg weekend, he didn't want
to be stuck up there alone again! LOL I'm sure it will be a nice
visit. My youngest is excited about him coming. He keeps asking
me when he's coming, what day mom? what Day? LOL
Any who.... here's my project for today! :o) 


Card stock, Ink, Window Punch, Owl Punch, 2 Ribbons - Stampin' Up
Designer Paper - DCWV/Bo Bunny
Googlie Eyes - Darice
Embossing Folder - Skeleton Scroll
Stamp - My Craft Spot
Ghost Brad - Oriental Trading
Cartridge - Pooh & Friends (Witch Hat) Cut @ 2"

I totally think this came out cute! But that's just me!
It was super simple to make and perfect for mailing
out to my sweet Great Niece & Nephew! That's all I
have for today! Thanks so much for stopping by!
Have an AWESOME DAY!!

Theresa

Thursday, October 13, 2011

Spoookieeee.....

Hello and Happy Thursday everyone! The week
is just about over and I get to create tomorrow! :o)
Remember 2 weeks ago when Hunter created the
Fall card? Well My Blogging friend Stephanie suggested
he make a Halloween card. Well I told him that and he
decided to create something different than a card!
Soooo today you'll get to see what he created.... :o)


Isn't it CUTE? I think he did a wonderful job!
He decided to make a Halloween Treat box for
2 of his friends that live across the street!
They're Brothers so they'll share the goodies inside!
He drew his box on paper first and then he
decided what cuts he was going to use...
Then he chose the Designer paper and colors!

Designer Paper - DCWV
Bo Bunny Double Dot was used for all the cuts!
Googlie Eyes - My Stash
Orange Ribbon - Stampin' Up
Gift Bag - Walmart
White Signo Gel Pen - Faux Stitching
Cartridge - Mini Monsters Cut @ 3 1/2"
Sweet tooth Boxes Cut @ 10 1/2"


He wanted the Word "Spooky" on 1 side of the box...
Cartridge - Mini Monsters Cut @ 2 1/2"
He even wanted to add white dots like I do...
Sooo CUTE! As you can see, he did! :o)


Cartridge - Happy Hauntings Cut @ 3"


More White Dots! :o)
Cartridge - Mini Monsters Cut @ 3 1/2"
He liked the idea of a shadow when I showed
him something I made so he copied it! :o)


He also liked my stitching... Sooo He copied that too!
I thought he did pretty good for his first time....
He also did the Stitching on the Monster's belly...
Although I still would have LOVED to ink everything
he said NOOO MOM! UGH! :o)
Cartridge - Happy Hauntings Cut @ 3"


I totally LOVE his idea for the inside.... He said Mom....
when the candy is all gone they're gonna say EEK! LOL
He's probably right about that! And yes... he did the dots
on this too! :o) Cartridge - Happy Hauntings Cut @ 1"

He did this box about a week ago and he's been asking
me to put it on the blog... so I promised him I would
do it today! I hope you guys like his treat box, because
he's already told me he has a Christmas Card he'd like
to make, and it sounds pretty nice from what he described.
Of course he'll do a drawing down on paper first and we'll
go from there! :o) Anyway.... Thanks so much for stopping
by and I hope everyone has an AWESOME Week/Weekend!!

Theresa & Hunter

Wednesday, October 12, 2011

Breast Cancer Awareness.....

Hello and Happy Wednesday everyone! I hope you are
all having a Fabulous week so far! Mine has been going
pretty good too! I've been designing some cards and 
hopefully over the weekend I can get them cut and put
together! Today is our Cricut Cardz Challenge!!!

“Think Pink!” October is Breast Cancer Awareness month. To help promote this worthy cause, make a card for a friend or a loved one for Breast Cancer Awareness month. It can be a reminder card for self-exams and mammograms, a card congratulating a breast cancer survivor, or a card of encouragement for someone currently going through the trauma of breast cancer. Use any cartridges you'd like and use Pink as your primary color.

Card stock, Designer Paper, Label Punch - Stampin' Up
Glitter Card stock - DCWV
Sentiment is Computer Generated
Cartridges - George & Basic Shapes
(Shapes with corner rounders) Cut @ 3 1/2"
Art Philosophy (Scallop) Cut @ 3"
Stand & Salute (Ribbon) Cut @ 3 1/2"
I Hope all of you participate in this wonderful
Challenge over at Cricut Cardz! This is a great time
to tell someone how much you care about
them or to remind a dear friend to make sure they
get an exam done. I look forward to seeing what
everyone creates! :o)

I'm also putting this into a couple of challenges as well:

My Sheri Crafts - Think Pink

Just Yolie - Link Up for PINK PARTY!

Cricut Circle Blog Weekly Challenge - Make a card
for world Card making day!

I'll be back tomorrow with something different to show you!
Thanks so much for stopping by, Have an AWESOME DAY!!

Theresa

Tuesday, October 11, 2011

2 more cards for the Challenges....

Hello and Happy Tuesday Everyone! I first want
to start by saying "THANKS" to all those wonderful
comments you left me yesterday! And Yes I was a busy
little bee trying to get these designed and completed!
I was able to get the other 2 cards done for the Circle
Blogs Challenge.... So this is the last of them! :o)

This first one is for the Sketch Challenge they are having:

Here's My Version of it...

(Click on Photo to Enlarge)

I really like how this turned out! I used some
of my Favorite DCWV paper to make it shine!
I don't know if you can see my 3 Gem stones in the
corner above the cake... But they are there! :o)
Here's the Recipe:

Card stock, Stamp, Punches, Silver Organdy Ribbon - Stampin' Up
Black Zig pen for the Stamp
EK Success Border Punch
Bling - Bazzill
Black Stickles
Cartridge - Everyday Pop-Up Cards
(Cake) Cut @ 2 3/4" (Rings) Cut @ 1 1/4"

Here's the other card...

(Click on the Photo to Enlarge)

The Challenge for this next one was to Have a Title,
At Least 2 Cricut Cuts, 3 Buttons....

Card stock - Stampin' Up, DCWV Shimmer, Bo Bunny Double Dot
Designer Paper - Echo Park
Baker's Red/White Twine
Xmas Red Stickles
Buttons - My Stash
Cartridge - Holiday Cakes
(Garland) Cut @ 1 3/4"
 (Ornaments) Cut @ 2 1/4"
(Happy Holidays) Cut @ 1 1/4"

I designed both cards in my Design Studio
then transferred them to the Gypsy for cutting....
Once I figured out the Design & Paper... they
both came together pretty quickly... Well That's
it on the Circle Blog Challenges... Thanks so much
for stopping by! Have an AWESOME DAY!!

Theresa

Monday, October 10, 2011

Lots of Cards.... Lots of Pictures...

Hello and Happy Monday Everyone! I hope you guys
had a wonderful weekend! I know I did! It was my
19th Wedding Anniversary! So I made a lovely dinner
and we just kind of hung out together! It made for a
nice relaxing Sunday! :o) I also made him a card....
Nooo surprise! :o) But I also managed to get a few
other cards done as well... The Cricut Circle Blog is
Celebrating their 1 year Anniversary and they have
a few challenges going on.... Normally I don't participate
in the challenges... But I got 4 of the challenges done
already and have 2 left to do.... They're designed so
I just gotta cut the pieces out and put together...
Sooo Today you'll See 4 different cards! WHAT?
4 different cards? I hope you like them all... Here ya go!

One of the challenges was to make a project using
any of the Circle Cartridges... I chose SOPHIE!

Card stock, Window Punches - Stampin' Up
Designer Paper - DCWV
Bling - Bazzill
Sentiment - Computer Generated
Cartridge - Sophie (Frame) Cut @ 3 1/2"
(Birds) Cut @ 3"

Just a quick side view to show the popped up LOVE birds!
I soooo LOVE how this turned out! :o)

Another Challenge was to make a Monochromatic project!
I gotta tell ya this was HARD for me! It's just not
something I would normally make... Sooo I was
Happy to try it out! That's what a challenge is for....
To Challenge yourself! :o) I chose shades of Brown....

Card stock - Stampin' Up, Bo Bunny, DCWV, Core'dination
Ribbon - My Stash
Ink - Stampin' Up
Stamp - Peachy Keen Monster Mash 3/8"
Cartridges - Art Philosophy (Card Shape) Cut @ 4 1/4"
(Leaves) Cut @ 2" & 2 1/4"
Simply Charmed (Happy Fall) Cut @ 1 1/2"
I popped up the Happy Fall and the Leaves...
I'm actually very happy with how this turned out! :o)

Next Challenge was to create something with your Imagine!
You guys know I LOVE my Imagine! Sooo I came up with this
really fun Halloween Card! :o)

Card stock - Stampin' Up, American Crafts, Bo Bunny
Embossing Folder - Swiss Dots
Border Punch - Martha Stewart
Cartridge - Buccaneer (Pirate) Cut @ 2 3/4"
I used the Imagine Default Shape (Circle) Cut @ 3 1/4" 
and Flood Filled it with the Buccaneer Designer Paper
Then I used the Imagine Default Shape (Square) Cut @ 4 1/2"
and Flood Filled it with the Buccaneer Designer Paper
Happy Hauntings (Happy Halloween) Cut @ 1"

Here's a side view to show the added layers from
Mr. Pirate! I used the Layers feature to pop up his
Hat, Boot, Jacket Trim, Shirt Trimming, Face...

Another Challenge was to create something using
your Cuttlebug! Another one of my Favorite tools!
Of course... by the time I started on this card it was
super duper late.... Like 4am! Sooo It's not my favorite
card! Anywhoo here's how I made it....

Card stock, Ribbon - Stampin' Up
Designer Paper - Basic Grey
Embossing Folder - Pumpkin Harvest
Cartridge - Thanksgiving (Pilgrim) Cut @ 3"
I cut her out once then I used the "Hide Contour"
for a second one to be the background...
(Thankful Heart) Cut @ 1 3/4"
This is also an odd size card (4 1/4 x 6)
not my normal size! :o)

Well that's all I have for you today! Boy I'm pooped! LOL
I'll be back tomorrow with a couple more to show!
Thanks so much for stopping by! Have an
AWESOME DAY!!!

Theresa

Thursday, October 6, 2011

Blessings one and all....

Hello and Happy Thursday! It's the end of the week
for me and that means crafting time! Yea! I don't get
much time in during the week like I use to so I look
forward to Thursdays because it means No school for
us on Friday and I can craft all day long! Gotta LOVE that!
Here's another one of the cards I made last weekend... :o)


This didn't take to much time at all to make....
No Cricut Cuts either! I know some of you shake
your head in shame! LOL But a girls gotta do
what a girls gotta do! :o) Here's the Details:

Card stock, Ink, Stamp, Ribbon, Scallop Border Punch - Stampin' Up
Designer Paper - DCWV Autumn Stack
Copper Eyelet - My Stash
Flower w/Button - Oriental Trading (I bought them a long
time ago and finally got around to using them)
Basically I took an 11 1/2 x 4 1/4" piece of Card stock
and scored at 4 1/4" and 9 3/4", then I took my
Scallop border punch and punched the one end
added a leave scallop border to that same end,
punched a hole to put an eyelet through...
Added the Designer paper on the other side and added
a piece of vanilla card stock on the inside....
Stamped then added the flower and put the ribbon
all the way around the card to make a bow
(Normally I NEVER use that much ribbon on a card)
I like to save my ribbon but this card needed the full affect
of the ribbon to go around the card... :o)


Well I hope you like my Thanksgiving card... Thanks so much
for stopping by! Have an AWESOME Week/Weekend!! :o)

Theresa